Introduction
In the first part of the article we have discussed the main issues of setting up custom modules environment. In the second part we will talk about integrating a custom module into TeamWox main page. For this we will need to implement several interfaces.
1. Hints Caching Manager
1.1. Interfaces
1.2. Example of Extending List of Hints
2. Widgets
2.1. The IWidgets Interface
2.2. Example of Implementing Custom Widget
3. ResPacker Utility
1. Hints Caching Manager
The "Home" module (first tab by default among the modules from standard delivery) displays different information in the form of short one-line messages at the bottom of TeamWox home page. These may be helpful hints about working in TeamWox groupware,
![]()
and information about company' activities, such employees birthdays.
![]()
The texts of these messages are provided by the special hints caching manager and appear at random. If a module is disabled, there will be no hints for it. In addition there is a certain set of hints, that are not bound to any module. Such hints will be displayed in any way.
1.1. Interfaces
To work with the hints caching manager, a custom module must provide the IModuleTips interface, described in TeamWox API.
IModuleTips
Your custom module must implement this interface, if you want to display information useful for users - inform them of additional TeamWox features, provided by your module.
Consider the implementation requirements for the IModuleTips interface methods.
- IModuleTips::GetTipsCount
Must return the total number of hints for the module.
virtual int GetTipsCount(const Context *context)
|
Parameter |
Type |
Description |
|---|---|---|
| context |
Context* |
Context of request processing. |
- IModuleTips::GetTip
Must return the pointer to static (unchanging) string with the text of hint from the general list of strings by specified index.
virtual const wchar_t* GetTip(const Context *context, int index)
|
Parameter |
Type |
Description |
|---|---|---|
| context |
Context* |
Context of request processing. |
|
index |
int |
Index of hint. |
- IModuleTips::GetTipEx
Must return the pointer to string with dynamically changing content. For example, it can be employees birthdays (the Team module), articles (the Administration module), etc.
virtual TWRESULT GetTipEx(const Context *context,int index,wchar_t *buf,size_t len)
|
Parameter |
Type |
Description |
|---|---|---|
| context |
Context* |
Context of request processing. |
|
index |
int |
Index of string. |
| buf |
wchar_t* |
Buffer with text. |
| len | size_t | Size of buffer with text. |
For your module you can display either only static strings or only dynamic strings, i.e. the IModuleTips::GetTip method's and IModuleTips::GetTipEx method's results are mutually exclusive.
ITipsManager
Hints caching manager is available as the ITipsManager interface. The hints list for a module should be stored in a text file in module resources. This allows hints to be edited and updated not only by developers, but also by technical writers and translators. The pointer to the ITipsManager interface must be requested in the class of module, that implements the IModuleTips interface.
You must register the text file with list of hints in the hints caching manager, where each hint - is one line. Hints are processed in several languages simultaneously, and in the context returns only those, that match currently selected language of TeamWox user interface.
The format of text file with hints (UTF-16 encoding) is much alike the format of language file with user interface translations. First comes the language group (three-letter code in brackets), and then - lines with the hints. And so on for every language. For example:
[eng]
string 1
string 2
........
[rus]
строка 1
строка 2
........
Strings may contain both plain text and hyperlinks. For example, link to a help section (see the first part of article) is added as follows:
<a href="#" onclick="top.TW_Help('module_name/subtopic/html_file_name');return(false);">text of link</a>
Consider the description of the ITipsManager interface methods.
- ITipsManager::Register
Registers external text file with the hints.
virtual TWRESULT Register(int module_id, const wchar_t *subpath)
|
Parameter |
Type |
Description |
|---|---|---|
|
module_id |
int |
Module ID. |
| subpath | wchar_t* | The path to file with hints relative to module DLL. |
- ITipsManager::GetTipsCount
Returns the number of hints stored in cache for the specified module.
virtual int GetTipsCount(const Context *context, int module_id)
|
Parameter |
Type |
Description |
|---|---|---|
| context |
Context* |
Context of request processing. |
|
module_id |
int |
Module ID. |
- ITipsManager::GetTip
Returns string with text of hint from hints cache by index.
virtual const wchar_t* GetTip(const Context *context, int module_id, int index)
|
Parameter |
Type |
Description |
|---|---|---|
| context |
Context* |
Context of request processing. |
|
module_id |
int |
Module ID. |
|
index |
int |
Index of string. |
It is best to place file with hints in the folder with module template or in the root folder of module.
1.2. Example of Extending List of Hints
Consider the implementation of features described above on example of the Hello World module. Source codes with all the changes are attached to this article.
1. Extend the functionality of module by inheriting the IModuleTips interface methods.
class CHelloWorldModule : public IModule, public IModuleMainframeTopBar, public IModuleTips
In our example we'll implement displaying of static hints, so in the GetTipEx method declaration immediately return the appropriate code.
//--- tips
int               GetTipsCount(const Context *context);
const wchar_t*    GetTip(const Context *context, int index);
TWRESULT          GetTipEx(const Context* /*context*/,int /*index*/,wchar_t* /*buf*/,size_t /*len*/) { return(RES_E_NOT_IMPLEMENTED); }
2. In the CHelloWorldModule::GetInterface method list and return the IModuleTips in the list of implemented interfaces.
//---
   if(StringCompareExactly(L"IToolbar",name))               { *iface = &m_toolbar;                                 return(RES_S_OK); }
   if(StringCompareExactly(L"IModuleMainframeTopBar",name)) { *iface = static_cast<IModuleMainframeTopBar*>(this); return(RES_S_OK); }
   if(StringCompareExactly(L"IModuleTips", name))           { *iface = static_cast<IModuleTips*>(this);            return(RES_S_OK); }
3. Get the pointer to the ITipsManager interface in the CHelloWorldModule module.
private:
   IServer           *m_server;
   ITipsManager      *m_tips_manager;
   CHelloWorldManager m_manager;
   CHelloWorldToolbar m_toolbar;
4. Initialize the hints manager.
//--- Prepare tips
   if(RES_FAILED(res=m_server->GetInterface(L"ITipsManager",(void**)&m_tips_manager)))
      ExtLogger(NULL,LOG_STATUS_ERROR) << "failed to get ITipsManager";
5. Register text file with hints during module initialization.
//---
   if(m_tips_manager!=NULL)
      m_tips_manager->Register(HELLOWORLD_MODULE_ID,L"templates\\tips.txt");
6. Add a few hints into the text file.
[eng]
HelloWorld tips
HelloWorld tips2
[rus]
Совет HelloWorld2
Совет HelloWorld
7. Implement the IModuleTips::GetTipsCount and IModuleTips::GetTip methods.
- CHelloWorldModule::GetTipsCount
//+------------------------------------------------------------------+
//| Get number of tips                                               |
//+------------------------------------------------------------------+
int CHelloWorldModule::GetTipsCount(const Context *context)
  {
   if(m_tips_manager==NULL) ReturnError(0);
//---
   return(m_tips_manager->GetTipsCount(context, HELLOWORLD_MODULE_ID));
  }
- CHelloWorldModule::GetTip
//+------------------------------------------------------------------+
//| Get tips                                                         |
//+------------------------------------------------------------------+
const wchar_t* CHelloWorldModule::GetTip(const Context *context, int index)
  {
   if(m_tips_manager==NULL) ReturnError(NULL);
//---
   return(m_tips_manager->GetTip(context, HELLOWORLD_MODULE_ID, index));
  }
8. Compile the project and make sure that tips.txt file (with tips for module) is located on the server inside the \modules\helloworld\templates\ folder. If a hint for the Hello World module does not appear immediately, scroll the ribbon with tips by pressing the ![]() button, until the desired hint will appear.
button, until the desired hint will appear.
![]()
2. Widgets
As you know, in TeamWox widgets are graphical elements of the "Home" module user interface, that are displayed as rectangular areas. Each of these rectangles displays information from a specific module.
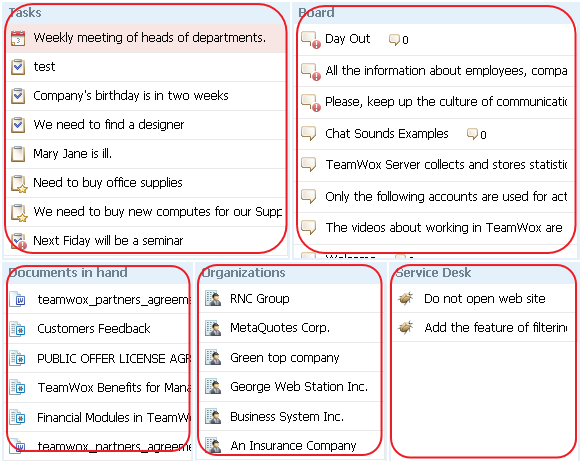
The "Home" module user interface allows you to adjust widgets size and location on the main page.
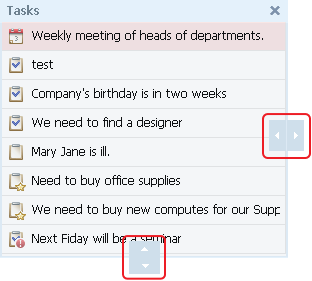
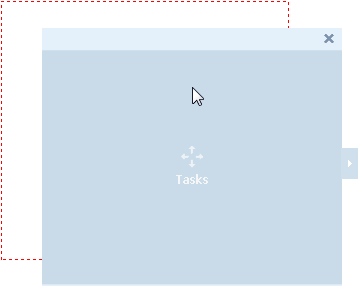
Using TeamWox SDK you can create widgets for custom modules, thereby increasing their functionality.
Widgets by their nature - are the representation of data (according to the MVC architecture), i.e. they are formed using the same principles as regular modules pages with a few exceptions The source code of widget template contains only the contents without the basic HTML tags <html></html>, <head></head> and <body></body>.
2.1. The IWidgets Interface
The IWidgets interface must be implemented in custom module, if you want to display information from this module on TeamWox main page as a widget. By implementing this interface, custom module describes environment and contents of a widget.
Consider the implementation requirements for the IWidgets interface methods.
- IWidgets::Total
Must return the total number of widgets.
virtual int Total(void)
- IWidgets::InfoGet
Must get information about specific widget.
virtual TWRESULT InfoGet(int widget_num,WidgetInfo *info)
|
Parameter |
Type |
Description |
|---|---|---|
| widget_num | int |
The index of widget. |
| info |
WidgetInfo* |
Information about the widget. Description of the WidgetInfo structure see below. |
- IWidgets::IsAccessible
Must check the access rights to the widget.
virtual TWRESULT IsAccessible(const Context *context,const wchar_t *guid)
|
Parameter |
Type |
Description |
|---|---|---|
| context |
Context* |
Context of request processing. |
| guid |
wchar_t* |
Textual ID of widget. |
- IWidgets::ProcessHeader
Must output the header source code, that loads the widget environment. You can add the code of downloading custom scripts into the header template.
virtual TWRESULT ProcessHeader(const Context *context,const wchar_t *widget_guid)
|
Parameter |
Type |
Description |
|---|---|---|
| context |
Context* |
Context of request processing. |
| widget_guid |
wchar_t* |
Textual ID of widget. |
- IWidgets::ProcessContent
Must output the contents of widget. The amount of displayed contents depends on the passed widget's width and height.
virtual TWRESULT ProcessContent(const Context *context,const wchar_t *widget_guid, int width, int height)
|
Parameter |
Type |
Description |
|---|---|---|
| context |
Context* |
Context of request processing. |
| widget_guid | wchar_t* | Textual ID of widget. |
| width | int | Conditional width of the widget. |
| height | int | Conditional height of the widget. |
- The WidgetInfo structure
|
Field |
Type |
Description |
|---|---|---|
|
type |
int |
The type of widget. Specified using the constants from corresponding anonymous enumeration, included into structure (see below). |
| object_guid |
wchar_t[32] |
Unique textual ID of widget. It can be both a random sequence of symbols, and a meaningful name. We recommend the following naming scheme: <module_name>_widget_<short_name_of_widget>. For example: helloworld_widget_simplewidget. |
| title |
wchar_t[64] |
Translation ID for the widget title. |
| title_url |
wchar_t[128] |
URL used to request to the desired module page. The text of a link is the title[64] field. For example, you may have two widgets: first displays the home page of a module and the second - a particular section of a module (as it is implemented in the Tasks and Favorite tasks widgets). |
| description |
wchar_t[128] |
Translation ID for the widget description. Widget description is displayed in widget layout mode, as well as when you hover the mouse cursor on widget icon. |
|
width_size |
int |
Conditional width of the widget. Specified using the constants from corresponding anonymous enumeration, included into structure (see below). |
|
height_size |
int |
Conditional height of the widget. Specified using the constants from corresponding anonymous enumeration, included into structure (see below). |
| icon_url |
wchar_t[64] |
The path to widget icon. It is specified relative to the \modules folder on TeamWox server. |
- Anonymous enumeration of widget types
| Name | Value | Description |
|---|---|---|
| TYPE_STATIC | 1 | Static widget. Static widget require two files: first contains widget's header with the necessary environment, second contains the contents of the widget. |
| TYPE_DYNAMIC | 2 | Dynamic widget. In this case only the header of widget is requested. Widget header contains JavaScript functions, that form the contents of widget, when it is loaded. |
| TYPE_ONLYDESKTOP | 0x80 | The flag, that enables widget to be displayed only in desktop browsers. Widget won't be displayed in browsers on mobile devices. |
- Anonymous enumeration of widget sizes
| Name | Value | Description |
|---|---|---|
| SIDE_TINY | 1 | Smallest size of widget's height or width. |
| SIDE_SMALL | 2 | Small size of widget's height or width. |
| SIDE_MEDIUM | 3 | Medium size of widget's height or width. |
| SIDE_LARGE | 4 | Largest size of widget's height or width. |
2.2. Example of Implementing Custom Widget
As an example, we will implement widget that will display data from the CPageNumberTwo page of the Hello World module. Source codes with all the changes are attached to this article. As a basis for implementation we will take source codes of the Board module, available in TeamWox SDK.
2.2.1. Implementing the IWidgets Interface
1. In the CHelloWorldModule::GetInterface method list and return the IWidgets among the list of implemented interfaces.
//---
   if(StringCompareExactly(L"IToolbar",name))               { *iface=&m_toolbar;                                 return(RES_S_OK); }
   if(StringCompareExactly(L"IModuleMainframeTopBar",name)) { *iface=static_cast<IModuleMainframeTopBar*>(this); return(RES_S_OK); }
   if(StringCompareExactly(L"IModuleTips", name))           { *iface=static_cast<IModuleTips*>(this);            return(RES_S_OK); }
   if(StringCompareExactly(L"IWidgets",name))               { *iface=&m_widgets;                                 return(RES_S_OK); }
//---
2. Create the new widget manager as a separate class. In it we will inherit the IWidgets interface methods, as well as will add an initialization method, which will be called when our module is initialized.
//+------------------------------------------------------------------+
//| Widget                                                           |
//+------------------------------------------------------------------+
class CHelloWorldWidgets: public IWidgets
  {
private:
   IServer            *m_server;
   CHelloWorldManager *m_manager;

public:
                     CHelloWorldWidgets();
                    ~CHelloWorldWidgets();
   //---
   TWRESULT          Initialize(IServer *m_server,CHelloWorldManager *manager);
   //---
   int               Total(void);
   TWRESULT          InfoGet(int widget_num,WidgetInfo *info);
   TWRESULT          IsAccessible(const Context *context,const wchar_t *guid);
   TWRESULT          ProcessHeader(const Context *context,const wchar_t *widget_guid);
   TWRESULT          ProcessContent(const Context *context,const wchar_t *widget_guid, int width, int height);
  };
3. Initialize the widget manager in the module.
- class CHelloWorldModule - declare inside the module class.
private:
   IServer          *m_server;
   ITipsManager     *m_tips_manager;
   CHelloWorldManager m_manager;
   CHelloWorldToolbar m_toolbar;
   CHelloWorldWidgets m_widgets;
- CHelloWorldModule::Initialize - call during module initialization.
if(RES_FAILED(res=m_widgets.Initialize(m_server,&m_manager))) ReturnErrorExt(res,NULL,"failed to initialize widgets manager");
- CHelloWorldModule::Initialize - implementation in the widgets manager class.
//+------------------------------------------------------------------+
//| Initialization                                                   |
//+------------------------------------------------------------------+
TWRESULT CHelloWorldWidgets::Initialize(IServer *server,CHelloWorldManager *manager)
  {
//--- Checks
   if(server==NULL || manager==NULL) return(RES_E_INVALID_ARGS);
//---
   m_server =server;
   m_manager=manager;
//--- Everything is OK
   return(RES_S_OK);
  }
4. In the widgets manager implementation fill out the WidgetInfo structure.
//---
static WidgetInfo widgets[]=
  {
       {
         WidgetInfo::TYPE_STATIC,                   // Widget type
         L"helloworld_widget_pagetwo",              // Text id of widget
         L"HELLOWOLRD_WIDGET_SIMPLE_TITLE",         // Widget header
         L"/helloworld/index",                      // Link of widget header
         L"HELLOWORLD_WIDGET_SIMPLE_DESCRIPTION",   // Widget description
         WidgetInfo::SIDE_MEDIUM,                   // Default width
         WidgetInfo::SIDE_MEDIUM,                   // Default height
         L"/helloworld/res/i/widget/simple.png"     // Path to widget icon
      }
As an icon you can take the avatar for this article.

Save this file in the <TeamWox_server>\modules\helloworld\res\i\widget\ folder under the simple.png name.
5. Implement the IWidgets interface methods.
- CHelloWorldWidgets::Total
//+------------------------------------------------------------------+
//| Total number of widgets                                          |
//+------------------------------------------------------------------+
int CHelloWorldWidgets::Total(void)
  {
//---
   return(_countof(widgets));
  }
- CHelloWorldWidgets::InfoGet
//+------------------------------------------------------------------+
//| Get information about widget                                     |
//+------------------------------------------------------------------+
TWRESULT CHelloWorldWidgets::InfoGet(int widget_num,WidgetInfo *info)
  {
   if(widget_num<0 || widget_num>=(int)_countof(widgets) || info==NULL) return(RES_E_INVALID_ARGS);
//---
   memcpy(info,&widgets[widget_num],sizeof(WidgetInfo));
   return(RES_S_OK);
  }
- CHelloWorldWidgets::IsAccessible
//+------------------------------------------------------------------+
//| Check if widget is accessible                                    |
//+------------------------------------------------------------------+
TWRESULT CHelloWorldWidgets::IsAccessible(const Context *context,const wchar_t* widget_guid)
  {
//---
   if(context==NULL || widget_guid==NULL) return(RES_E_INVALID_ARGS);
   if(context->request==NULL)             return(RES_E_INVALID_ARGS);
//--- find out, what widget we need to display
   if(PathCompare(L"helloworld_widget_pagetwo",widget_guid))
     {
      return(RES_S_OK);
     }
//---
   return(RES_S_OK);
  }
- CHelloWorldWidgets::ProcessHeader. If true is passed into constructor of widget page class, then page header will be displayed.
//+------------------------------------------------------------------+
//| Process header                                                   |
//+------------------------------------------------------------------+
TWRESULT CHelloWorldWidgets::ProcessHeader(const Context *context,const wchar_t *widget_guid)
  {
   TWRESULT res=RES_E_NOT_FOUND;
//--- Checks
   if(context==NULL || m_manager==NULL || widget_guid==NULL) return(RES_E_INVALID_ARGS);
   if(context->request==NULL)                                return(RES_E_INVALID_ARGS);
//--- find out, what widget we need to display
   if(PathCompare(L"helloworld_widget_last",widget_guid))
      res=CPageWidgetSimple(true).Process(context,m_server,context->request->Path(),m_manager,0,0);
//---
   return(res);
  }
- CHelloWorldWidgets::ProcessContent. If false is passed into constructor of widget page class, then page contents will be displayed.
//+------------------------------------------------------------------+
//| Process contents                                                 |
//+------------------------------------------------------------------+
TWRESULT CHelloWorldWidgets::ProcessContent(const Context *context,const wchar_t *widget_guid,int width,int height)
  {
   TWRESULT res=RES_E_NOT_FOUND;
//--- Checks
   if(context==NULL || m_manager==NULL || widget_guid==NULL) return(RES_E_INVALID_ARGS);
   if(context->request==NULL)                                return(RES_E_INVALID_ARGS);
//--- find out, what widget we need to display
   if(PathCompare(L"helloworld_widget_pagetwo",widget_guid))
      res=CPageWidgetSimple(false).Process(context,m_server,context->request->Path(),m_manager,width,height);
//---
   return(res);
  }
2.2.2. Widget HTTP API
As an example, let's display data from the PageNumberTwo page on our widget. Accordingly, while implementing widget's HTTP API and UI we will take PageNumberTwo source code and its template as a basis.
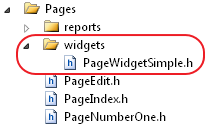
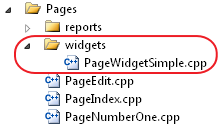
1. In our project, create the new page for widget. Following the logic of organizing module pages, place it in the 'widgets' subfolder (similar to the reports pages).
2. In the CPageWidgetSimple class declaration limit the number of entries displayed per page up to 64. It is unsuitable to display numerator tabs in a widget, and more than 64 lines simply won't fit on any screen.
class CPageWidgetSimple : public CPage
  {
private:
   IServer          *m_server;
   CHelloWorldManager *m_manager;
   //---
   HelloWorldRecord  m_info[64];             // Number of records per numerator's page
   int               m_info_count;
3. Like the other module pages, the PageWidgetSimple page must implement the CPage::Process method to display content and the IPage::Tag method to process the tokens used in templates. In the CPageWidgetSimple::Process call add two parameters, which tell the real size (in pixels)of widget.
public:
   //--- functions of displaying
   TWRESULT     Process(const Context *context,IServer *server,const wchar_t *path,CHelloWorldManager *manager,int width,int height);
   bool         Tag(const Context *context,const TagInfo *tag);
4. Add a switch to display the widget header. This switch is passed to the page class constructor from the widgets manager. With its help you can control the display of the widget header in the CPageWidgetSimple::Process method.
private:
   bool              m_header_mode;
5. Declare two methods, that will display the header code and the code content of the widget, respectively.
private:
   void              operator=(CPageWidgetSimple&) {}
   //---
   TWRESULT          ShowHeader(const Context *context,int show_count);
   TWRESULT          ShowContent(const Context *context,int show_count);
6. In constructor of widget page initialize the mode of displaying widget's title.
//+------------------------------------------------------------------+
//| Constructor                                                      |
//+------------------------------------------------------------------+
CPageWidgetSimple::CPageWidgetSimple(bool header_mode) : m_server(NULL),m_manager(NULL),
                                                         m_info_count(0),m_header_mode(header_mode)
  {
//---
   ZeroMemory(m_info,sizeof(m_info));
//---
  }
7. For simplicity, when page is requested we will display only the contents of our widget.
//+------------------------------------------------------------------+
//| Process request                                                  |
//+------------------------------------------------------------------+
TWRESULT CPageWidgetSimple::Process(const Context *context,IServer *server,
                                    const wchar_t* /*path*/,CHelloWorldManager *manager,int /*width*/,int height)
  {
//--- Checks
   if(context==NULL || manager==NULL) return(RES_E_INVALID_ARGS);
//---
   m_manager=manager;
   m_server =server;
//--- DISPLAY PAGES
   if(m_header_mode)
      return(ShowHeader(context,(height/30)+1));
   else
      return(ShowContent(context,(height/30)+1));
  }
8. Implementation of header source code output. Leave widget header template blank.
//+------------------------------------------------------------------+
//| Display header                                                   |
//+------------------------------------------------------------------+
TWRESULT CPageWidgetSimple::ShowHeader(const Context *context,int show_count)
  {
//--- Checks
   if(context==NULL || m_server==NULL) return(RES_E_INVALID_ARGS);
//---
   return(m_server->PageProcess(context,L"templates\\widgets\\headers.tpl",this,TW_PAGEPROCESS_NOCACHE));
  }
9. Implementation of contents source code output.
//+------------------------------------------------------------------+
//| Display contents                                                 |
//+------------------------------------------------------------------+
TWRESULT CPageWidgetSimple::ShowContent(const Context *context,int show_count)
  {
   TWRESULT res=RES_S_OK;
//--- Checks
   if(context==NULL || m_manager==NULL || m_server==NULL) return(RES_E_INVALID_ARGS);
   if(context->request==NULL)                             return(RES_E_INVALID_ARGS);
//---
   m_info_count=_countof(m_info);
   if(m_info_count>show_count) m_info_count=show_count;
//--- Get required number of records starting from desired position
   if(RES_FAILED(res=m_manager->InfoGet(context,m_info,1,&m_info_count)))
     {
      if(res!=RES_E_NOT_FOUND && res!=RES_E_ACCESS_DENIED)
         ReturnErrorExt(res,context,"failed to get records list");
      //---
      return(res);
     }
//--- Display
   return(m_server->PageProcess(context,L"templates\\widgets\\simple.tpl",this,TW_PAGEPROCESS_NOCACHE));
  }
10. Implementation of the CPageWidgetSimple::Tag method can be completely copied from the CPageNumberTwo::Tag. At the end we will have the <tw:records /> token, containing the data displayed on the PageNumberTwo page.
2.2.3. Widget User Interface
1. Taking the number2.tpl template as a basis, we will display one column of the table and fill it with data from the <tw:records /> token .
<table id="helloworld_widget_simple_list" class="std_table" cellpadding="0" cellspacing="0" border="0"
 style="width:100%;table-layout:fixed;margin:0px;">
</table>
<script type="text/javascript">
(function()
  {
   var table_obj = document.getElementById('helloworld_widget_simple_list'),
       index     = 0,
       data      = <tw:records />;
   //---
   for(var i in data)
     {
      table_obj.insertRow(index++).insertCell(0).innerHTML=['<a href="/helloworld/number_two/view/',data[i].id,'">',data[i].name,'</a>'].join('');
     }
  })();
</script>
Currently TeamWox JavaScript Framework yet can't be used to design widgets user interface, but developers are planning to add such a possibility in nearest future.
2. Compile the project, update the resources, start TeamWox server and open the main page.
3. Open the panel of editing widgets. As you can see, now you can add custom widget for the Hello World module.

4. Drag it to the main page layout and adjust the size.
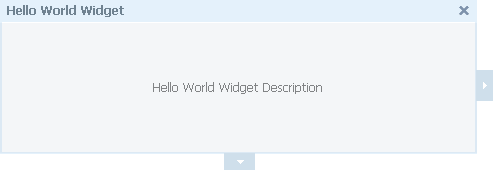
5. Save the configuration and refresh page in your browser (take this peculiarity into account - widget displays data only after reloading the page).
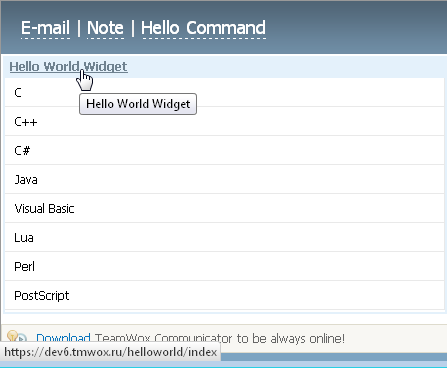
Now the widget displays PageNumberTwo data on the TeamWox main page!
3. ResPacker Utility
Web projects contain a large number of resource files. In TeamWox groupware resources include: images (*.png, *.bmp, *.jpg, *.gif, *.ico), cascading style sheets (*.css), custom scripts (*.js), HTML help files (*.htm, *.html), as well as page templates (*.tpl) and other supported file formats. When a module is deployed at the client, developers face two sequential problems.
-
Synchronization/Update. With each new project build it is required to synchronize files and folders on customers' TeamWox servers. Adding new, deleting obsolete, updating changed folders and files - all these require a series of operations that must be checked for success. Accordingly, the more such operations, the greater the probability of errors.
- Backup. To perform backup a TeamWox server must be stopped, so that users won't be able to work with the system. For this operation to affect the smallest possible number of users, it is usually performed at night. But even at this time, users located in other time zones can work with TeamWox. To minimize the downtime, the backups should be performed as quickly as possible. In fact, it is impossible for lots of small files.
TeamWox developers initially decided to store resources in compressed state. Each module (in addition to its DLL) includes only one archive with resources. So, the first problem is narrowed to updating just one file, and the second is solved significantly faster, as with one large file is copied faster than many small ones with the same overall size. As a result, both tasks are resolved much simpler, faster and reliable.
To create an archive with module's resources you should use command-line utility ResPacker.exe, that is a part of TeamWox SDK. This is the demand, that comes from TeamWox developers. Name and file extension are strictly fixed - res.dat - since the file is handled by TeamWox server, not by module.
Processing of res.dat file has an absolute priority compared to uncompressed resources. A folder with module DLL can simultaneously contain res.dat file and resources folder (e.g. \res), registered in the IServer::VirtualPathRegister method implementation. First, the res.dat file will be processed and only then (if the file doesn't contain any resources or if the file is corrupted) the server will look for resources in the \res folder.
Using ResPacker
By default ResPacker is installed in the TeamWox SDK\bin folder. This command line utility has concise, but self-sufficient help. Utility supports two modes of operation - packing folders into archive (the /pack switch) and unpacking resources from archive (the /unpack switch). Consider them on example of the Hello World module. Its DLL is located in the "C:\Program Files\TeamWox\modules\helloworld\" folder, and the resources - in the \res subfolder.
1. Packing Resources. As an arguments, specify the /pack switch, then the colon, then the path to module DLL in quotes, the space and the filename res.dat. As a result of running this command ResPacker utility will creates res.dat file.
"C:\Program Files\TeamWox SDK\bin\respacker.exe" /pack:"C:\Program Files\TeamWox\modules\helloworld" res.dat
2. Unpacking Resources. To unpack specify the /unpack switch, then the colon, the path to folder, in which you want to extract resources, the space and the filename res.dat. As a result of running this command ResPacker utility will unpack res.dat contents into specified folder.
"C:\Program Files\TeamWox SDK\bin\respacker.exe" /unpack:"C:\Tmp" "C:\Program Files\TeamWox\modules\helloworld\res.dat"This mode is used if you want to learn the details of other modules, including ones from standard delivery.
If you execute this command directly from the folder with module DLL, it is enough to specify the dot (.) instead of full path. In addition, it is recommended to add the path to respacker.exe into the Path environment variable for more convenient usage of this utility.
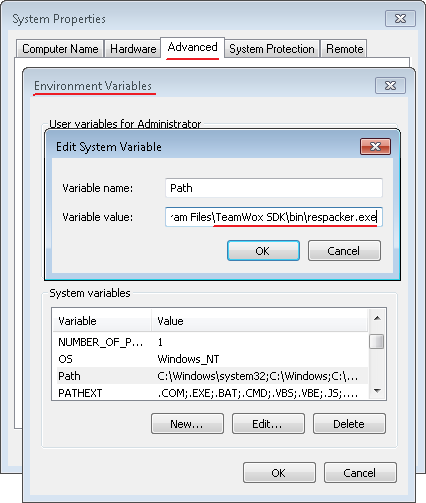
You should use ResPacker only to compile the final version of your module (the Release configuration). To do this, in project settings you must add the console command, that will be executed after module compilation (the Post-Build Event). For the Hello World module and other modules included in TeamWox SDK this setting is already set.

Conclusion
The two parts of this article, we have considered important issues that arise in custom modules development for the TeamWox groupware. You've learned how to properly set up module's environment, what resources are and how to efficiently store and maintain them, how to add widgets and hints with user commands.
- How to Add a Ready-made Module to TeamWox
- How to Add Page into TeamWox Module
- Building User Interface
- Interaction with DBMS
- Creating Custom Reports
- TeamWox File Storage - Part 1
- TeamWox File Storage - Part 2
- Setting Up Custom Modules Environment - Part 1
- Setting Up Custom Modules Environment - Part 2
- Setting the Online Assistant on Your Website
- How to create additional language pack for TeamWox
2011.04.28
