Working with Payments
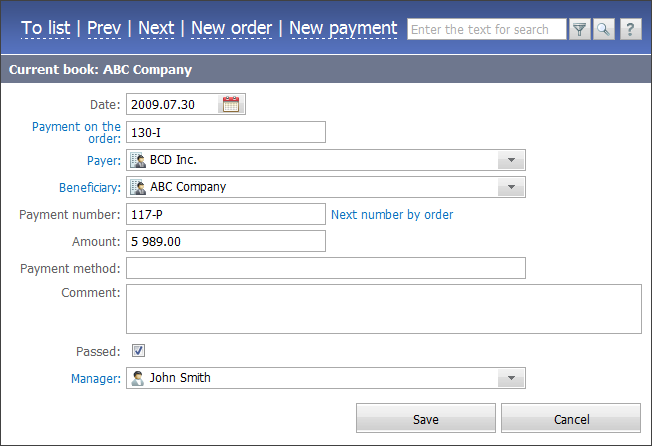
In order to add a payment one should press the "New payment" button when viewing the list of documents or when editing a payment. One can also add a payment for a certain order clicking "Pay order" in its viewing mode. Details in the payments are automatically filled out in accordance with the paid order. In order to edit a payment one should enter it from the list of documents.

Several buttons are located in the upper part of the window of working with payments:
- To list — return to viewing the list of documents;
- Prev — view the previous document;
- Next — view the next document;
- New payment — create a new payment. Details of the current payment are be automatically specified in the new payment, except for the payment number that is the next successive number, as well as the order number that should be specified manually.
Further parameters of the payment are specified:
- Date — payment date. It can be specified manually or using the interactive calendar that is opened when clicking the
 button.
 - Payment on the order — number of the invoice, on which the payment is made. Click on this field to view the selected order.
- Payer — organization that makes the payment. A click on this field opens the list of all organizations added into the corresponding module. Click on the name in this field to view details of the selected organization.
- Beneficiary — organization that receives the payment. It is also selected from the list that is opened by a click on this field. Click on the name in this field to view details of the selected organization.
- Payment number — payment number. The successive number for this pair "payer-beneficiary" can be assigned automatically if the "Next number" button is pressed.
- Amount — payment amount.
- Payment method — method of payment the transaction was made by.
- Comment — a text comment.
- Passed — if this field is checked, the payment is considered passed. Unpassed payments are not included in the generation of reports.
- Manager — employee responsible for the payment. By default, the employee that adds the payment is indicated in this field. In order to indicate another manager, one should click on this field and select a user in the appeared list. Click on the selected name will show the user's details in the "Team" module.
In order to be able to pass payments, an employee must have corresponding right that can be granted by the system administration. |
In order to save changes the "Create" button should be pressed.
Integration with the "E-Bank" Module
The "Accounting" module is integrated with the "E-Bank" module. When new transactions come to the "E-Bank" module the corresponding payments are created in the "Accounting module" in accordance with the routing rules.
Payments created on the basis of transactions in the "E-Bank" module have an additional field displayed - the number of the transaction:

If a transaction is recognized incorrectly and, as a result, an incorrect payment is created on its basis, that payment can be canceled using the Return to 'e-Bank' button. Once it is pressed, the payment is deleted and the initial transaction in the "E-Bank" is marked as unrecognized. Then you can correct the routing rules and run recognition of transactions again.