- Welcome
- TeamWox Communicator
- Diagrams
- Editor
- Templates
- User Details
- Getting Started
- Browser Settings
- Calendar
- Calls
- Charts
- Exit
- File Viewers
- Filters
- Notifications
- Certificate Installation
- Interface
- List of Assigned
- Mind Map
- Permissions
- Search
- Status
- Google Translate
- Windows
- Home
- Tasks
- Documents
- Service Desk
- Chat
- Organizations
- Contacts
- Board
- Team
- Products
- Accounting
- E-Bank
- Search
- Calendar
- Telephony
- Administration
- Projects
Mind Map
TeamWox provides a possibility to create such maps for graphical representation of one or another idea. In order to create a mind map, you should press the  button located in the lower part of the message editor. The mind map editor window should appear as soon as you press that button:
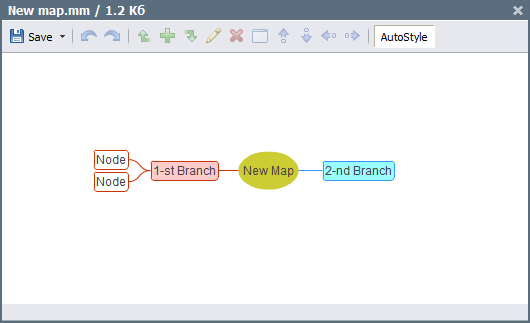
When you start creating a map, there is only one central node in it. In order to change the text inside it, you should double-click on it and type a text using your keyboard. After that you should press the "Enter" button.
The file name of the map created is the text in the central element. |
To change an element or to add a new one, you should select the necessary one and use one of the following commands located in the lower part of the editor:
 — save the mind map under the specified name. The submenu of this command that is opened when clicking on the down arrow allows to save a mind map as a picture of the PNG format.
 — undo the previous action. You can also use the hotkey "Ctrl+Z".
 — redo the previously cancelled action. You can also use the hotkey "Ctrl+Y".
 — add a child node to the selected element. A new branch starting from the selected node should appear as soon as you press it. You can also use the hotkey "Insert".
 — add a node above the selected one and equivalent to it. A new branch starting from the same node as the selected one should appear above it. You can also use the hotkey "Shift+Enter".
 — add a node below the selected one and equivalent to it. A new branch starting from the same node as the selected one should appear below it. You can also use the hotkey "Enter".
 — edit the selected node. The text field of the selected node becomes editable as soon as you press it. You can enter the editing mode by double-clicking on the node or pressing the hotkey "F2". In order to complete editing, you should press the "Enter" button.
 — delete the selected node. You can also use the hotkey "Delete".
 — open the properties window of the selected element. You can also use the hotkey "F9".
 — move the selected node up.
 — move the selected node down.
 — move the selected node to the left.
 — move the selected node to the right.
 - enable/disable the automatic choice of the style for each subsequently created node. You can also use the hotkey "F7".
Most of the commands mentioned above are also represented in the context menu that can be opened by pressing with the right mouse button on the selected node. There is also an additional command, "Multiline Edit", in it. You can use it to type a text that contains several lines in the node. You can use the hotkey "F3" to enter this mode, as well.
A map can be edited after it has been saved. To do it, you should press the ![]() edit button located to the right of the attached map in the message editor. In order to delete the map, you should press the
edit button located to the right of the attached map in the message editor. In order to delete the map, you should press the  delete button. Maps can also be edited after the comment has been added. To do it, you should press the
 ![]() button that appears if you put the mouse cursor over the attached file.
button that appears if you put the mouse cursor over the attached file.
You can view the created maps using the embedded viewing tools.
Node Properties
In order to open the window of node properties, one should press the  button in the upper menu of the editor, or choose a node and execute one of the commands in the menu:

 — style settings of the node. The same action can be performed using the F4 key.
 — setting up of node attributes. The same action can be performed using the F5 key.
 — setting up of node icons. The same action can be performed using the F6 key.
 — setting up of node links. The same action can be performed using the F7 key.
 — setting up of node arrows. The same action can be performed using the F8 key.
 — setting up of comments to the node. The same action can be performed using the F9 key.
- Using the
 arrows, one can add a new node in the indicated direction. This kind of buttons appear around the selected node in all directions where the new node can be added.
Styles
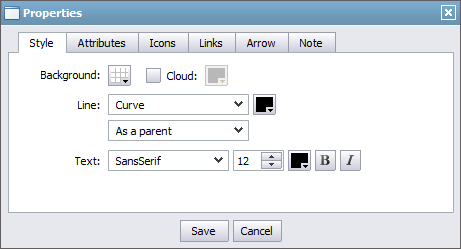
You can choose the style of the selected node on the "Style" tab.
- Background — the choice of the node background color.
- Oval — to encircle or not the node with a line that connects it to other nodes.
- Cloud — to show or not a cloud around the node. You can also choose the color of that cloud.
- Line — the upper field is intended for specifying the type and color of node joining lines. The lower one allows to specify the thickness of lines. If you choose the "Other" variant then the additional field, where you can specify the thickness manually, will appear.
- Text — adjusting the style of the node text, you can change the type, size, color of the text or make it italic or bold.
Attributes
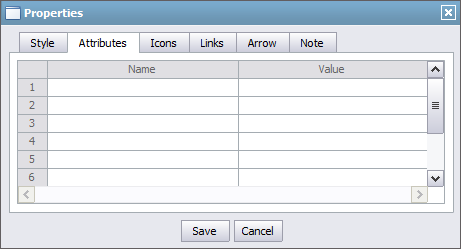
You should type the name and the value of the attribute in the "Name" and "Value" columns, respectively. The information is displayed as soon as you put the cursor of your mouse over a special icon inside the node:

To delete a row from the table, you should select the necessary one and press the "Remove" button.
Icons
![]()
You can add one or more icons to the node on the "Icons" tab. To add an icon, you should just click on it in the right part of the window. To delete an icon, you should click on the necessary one in the left part of the window. The icons is displayed inside the node as follows: ![]() .
.
Links
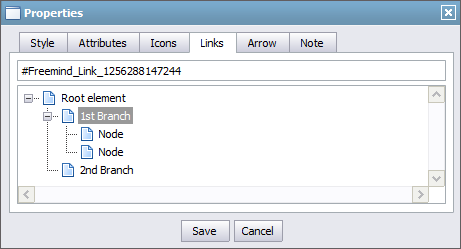
You can create links inside the nodes on the "Link" tab. Three types of links are available:
- Internal link — a link to another node of the same map. In order to create such a link, you should choose the necessary node from the list of the available ones and press the "Save" button. Once you've done it, a green arrow appears inside the node. If you press on it, you should be passed to the specified node:
 .
. - Link to another map — a link to any mind map. In order to create it, you should specify the corresponding link in the address field (for example, "http://mm_website.net/maps/some_map.mm"). This will make the corresponding icon appear inside the node. You should be passed to viewing that map as soon as you press on that link:
 .
. - Link to any other resource — any link. If you specify a link to a resource, a red arrow should appear inside the node. If you press on it, you should be passed to the specified address:
 .
.
Arrow
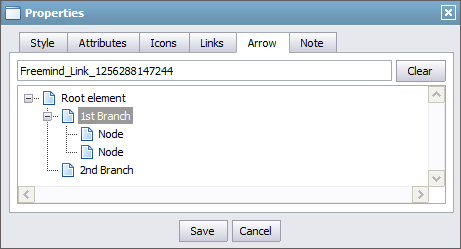
On the "Arrow" tab, you can create arrows starting from the selected node and pointing at another node. To create an arrow, you should choose the necessary node in the list and press the "Save" button. The corresponding arrow appears as soon as you do it:

To delete an arrow, you should press the "Clear" button.
Note
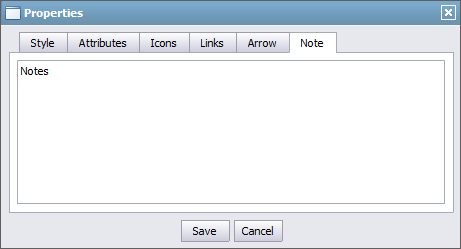
You can create notes of the node on the "Note" tab. To do it, you should type the text and press the "Save" button. The node is displayed as a pop-up help when you put the cursor of your mouse over a special icon inside the node:

In order to delete the node, you should delete all the text and press the "Save" button.
Context Menu
Context menu of a node allows to execute the following commands:
- Add (Insert) — add a child node to the selected element.
- Add Derived Down (Enter) — add a node below the selected one and equivalent to it.
- Add Derived Up (Shift+Enter) — add a node above the selected one and equivalent to it.
- Edit (F2) — edit text inside the node.
- Multiline Edit (F3) — open the node text in a separate window for multiline editing.
- Delete (Delete) — delete the selected node.
- Properties — open the window of node properties.
- Move to top — move the node up.
- Move to bottom — move the node down.
- Move left — move the node to the left.
- Move right — move the node to the right.