- Welcome
- Home
- Tasks
- Documents
- Service Desk
- Public Component
- Creating/Changing Groups
- Creating a Request
- Assigned
- Comments
- Deleting Groups
- Filters
- Integration
- List of Requests
- Monitoring
- Permissions
- Reports
- Status of Requests
- View Requests
- Widgets
- Chat
- Organizations
- Contacts
- Board
- Team
- Products
- Accounting
- E-Bank
- Search
- Calendar
- Telephony
- Administration
- Projects
Creating a Request
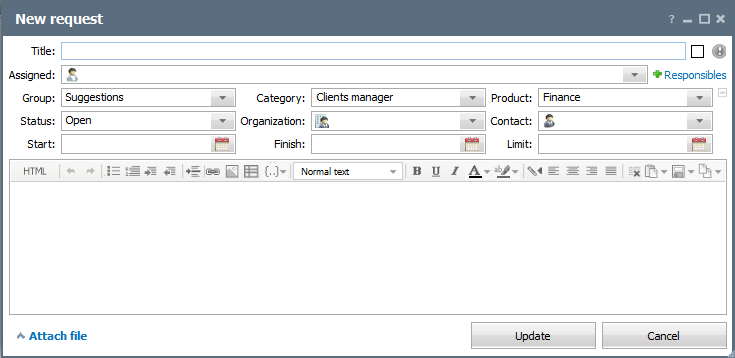
In order to start the creation of a request, one should press the "New request" button located in the upper part of the "Service Desk" tab. After that the below window will appear:

In the request creation window the following field must be filled out:
 — color marking of a request. The color of a request appears on the left of its name (in the list and in view mode).
 — using this button you can assign a higher priority to a request. It will become
  as soon as you press it. Icons, numbers and titles of higher-priority requests are shown red colored in the list and when viewing them.
- Assigned — pressing on this field will open the list of users/groups in the system. From it you can assign a request to employees. Assigned employees will see this request independent of their rights to the group, in which the request is created. If assigned employees are not selected, the user with full viewing rights can assign the request to competent employees.
- Responsibles — for each request one can create a list of employees that are responsible for its fulfillment. This allows to increase the control over the fulfillment of requests. The responsible employees will be displayed in the heading of requests while viewing. In addition, each employee can see the list of all requests they are responsible for in the special filter.
In order to open the field of assigning responsibles, one should press the Responsibles.
 - Group — in this field a group, to which the request refers, should be selected from the dropdown list.
- Category — if categories are created in the group, one of them must be selected here from the dropdown list. The first category in the list is shown by default.
- Product — if distribution of requests by products is implemented in the group, one of them must be selected in this field. The first product from the list is shown by default.
- Status — status of the request that can be selected from the dropdown list. The default states "Open" is selected when a request is created. After that its status can be changed either by its author or by executors.
- Organization — pressing on this field will open a list of organizations added to the corresponding module of the system. Binding of a requests allows to view it on the corresponding tab of the organization. Statistics of organizations that addressed their requests is also reflected in reports.
- Contact — pressing on this field will open the list of contacts added to the system. Bind the request to the contact in order to easily move to viewing the full information about the contact by a click on the name in the list.
- Start — when handling the request was started. If it is not specified, then after the request is created this field will be automatically filled with the date of creation. Further this date can be changed using the interactive calendar that is opened by pressing the
 .
. - Finish — date when the request handling is over. This field is automatically filled as soon as the status of the request is changed to "Completed", "Closed" or "Rejected". The finish date can also be changed manually using the interactive calendar.
- Limit — the time limit for request execution. 24 hours before the limit expiration, the request color in the list will be changed to green. After the expiration, the request will become red. If a request is created for an organization that has a set SLA, the limit date will be filled automatically. For example, if the SLA is 48 hours and the request is created on 10:30 2017.01.10, the limit will be set to 10:30 2017.01.12.
|
The request body is written in message editor located in the lower part of the window. To complete creation of the request press the "Add" button.