- Welcome
- Home
- Tasks
- Documents
- Assigned
- Delete Mailbox
- Filters
- Email List
- Create/Edit Mailbox
- Create Mail
- Permissions
- Reply/Forward
- Reports
- Service
- Working with Spam
- View Mail
- E-Mail Widgets
- Service Desk
- Chat
- Organizations
- Contacts
- Board
- Team
- Products
- Accounting
- E-Bank
- Search
- Calendar
- Telephony
- Administration
- Projects
Create/Edit Mailbox
Create Mailbox
In order to create a new mailbox profile in TeamWox, you should press the ![]() New mailbox button located under the already created mailboxes on the left side of the "E-Mail" tab.
New mailbox button located under the already created mailboxes on the left side of the "E-Mail" tab.
Edit Mailbox
In order to start editing your mailbox, you should press the ![]() button that appears to the right of the mailbox name, as soon you put the cursor over it.
button that appears to the right of the mailbox name, as soon you put the cursor over it.
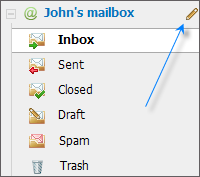
The window of mailbox editing appears, if you press the "Edit" button. This window is exactly the same as that appearing when creating a new mailbox. The only difference is the presence of the Delete mailbox button located in the lower part of the window. The instructions of how to delete a mailbox are given in the corresponding section.
The windows of creating and editing a mailbox settings are virtually the same. They contain five tabs:
Information
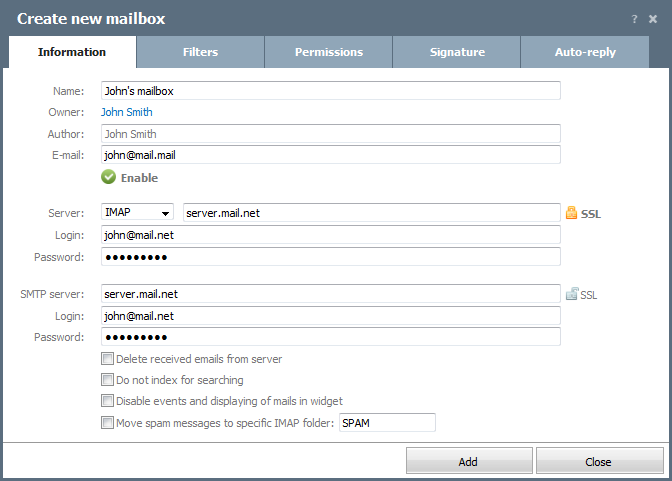
You should fill out the following fields on this tab:
- Name — the new mailbox name that will be shown on the left side of the "E-mail" tab.
- Owner — the owner of this mailbox. If you press on the current owner's name, the list of employees should appear where you can choose a new owner. The instructions of how to use that list are given in the corresponding section.
- Author — name, which will be used as the sender name for mails sent from this mailbox.
- E-mail — the web address of your mailbox.
- Enable/Disable — the "Enable" button is intended to enable/disable your mailbox. One click on this button switches off your mailbox (the button becomes gray:
 ), the repeated click makes this mailbox enabled (the button becomes green again).
 - Server — you should choose the type of the mail-server (POP3 or IMAP) and enter the address of the incoming mail server (for example: pop.mail.ru). The button that turns on/off SSL is located to the right of the "Server" field. (Secure socket layer is a cryptographic protocol that provides secure communications on the Internet. It makes the connection between a client and a server secured.) The single click enables the SSL (the button becomes golden), the repeated click disables the SSL (the button becomes gray).
- Login — the user login to enter the incoming mail server.
- Password — the password to enter the incoming mail server.
- SMTP Server — the address of the outgoing mail server (for example: smtp.mail.ru). The SSL on/off button is also located at the end of this field.
- Login — the user login to enter the outgoing mail server.
- Password — the password to enter the outgoing mail server.
- Delete received e-mails from server — if you check this option, then all mails will be removed from the mail server after they have been received by TeamWox e-mail client (for "POP" servers).
- Do not index for searching — if this option is enabled, the information that comes to the mailbox won't be indexed by the internal search system; it also won't take part in full reindexing of information. Enabling this option is recommended for the service mailboxes and for the boxes that receive insignificant information (for example, different mailing from websites). This allows to save the resources of the system.
- Disable events and displaying of mails in widget — this function allows to disable the notifications (including the sound ones) about new incoming messages of the mailbox. Also, if this option is enabled, the messages of this mailbox won't be shown in the "Last messages" widget. It is recommended to enable this option for the service and corporate mailboxes with intensive flow of messages.
- Move spam messages to specific IMAP folder — this field is intended for working with spam messages. The name of the IMAP folder (mailbox) at the mail server is specified to the right. All messages from the "Spam" folder will be sent there for autotraining of the server. This field is visible only when the IMAP type of the server is chosen.
|
Filters
The mailbox filters can be created on this tab. In order to create a filter, you should press the ![]() New filter button. As soon as this button is pressed a new filter field appears:
New filter button. As soon as this button is pressed a new filter field appears:
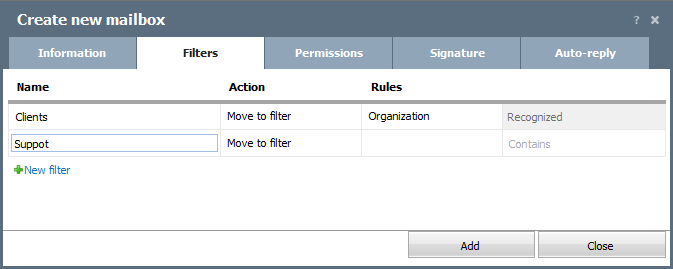
The following parameters should be specified for a filter:
- Name — name of the filter.
- Action — in this field, choose the action to be performed if a mail complies with the filter conditions:
- Move to filter — move an e-mail to this filter.
- Move to trash — move an e-mail to "Trash" folder.
- Move to spam — move an e-mail to spam.
- Mark — if you select this action, a new folder will be created where you can move any letters manually. No filtering conditions are set.
- Rules — choose the field of the mails, by which the filter will work, in the "Search in" field (from, to, subject, organization, contact, user, header). Then enter the filtering criterion itself in the field located to the right (for example, the web address of the e-mail).
|
Once the filter has been added, the line showing the filter name and its application conditions appears:

If you point the mouse cursor at the filter, the following buttons appear:
 — move the filter up. If there are more than one filter in your mailbox, then messages will be filtered from top to bottom, i.e., at message processing, the system will first check the conditions of the first filter, then those of the second filter, if the first ones haven't applied. To change the message filtering sequence, you should rearrange filters according to your desire.
 — move the filter down.
 — delete the filter.
You can create the desired number of filters by pressing the ![]() New filter button, that slides down every time you create another filter.
New filter button, that slides down every time you create another filter.
In order to create an additional condition for already existing filter you should create another filter with the same name:

This example shows that the incoming e-mails from both mailboxes will be moved to "ABC Company".
Examples of creation and manipulations with filters are given at the separate section "Filters". |
Permissions
You can assign the access rights to view, edit or administer this mailbox to other users.
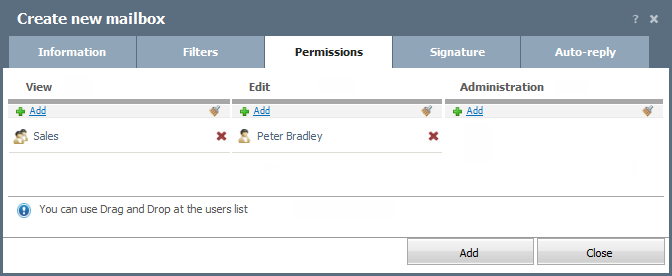
You can assign or take away the access rights by pressing the ![]() Add or
Add or  buttons, respectively. The window of assigning users appears, as soon as you press the "Add" button. The instructions of how to use it are given in the "Interface Description -> List of Assigned" section. To remove all the users from the list of already assigned ones, you should press the
  button. If you need to remove a certain user from the list, then press the
  button located to the right of each user in the list of assigned users.
Permissions are divided into the following categories:
- View — users (groups) will only be able to view messages in the mailbox.
- Edit — users (groups) in addition will be able to reply to e-mails, create new ones, edit and delete existing e-mails.
- Administration — users (groups) in addition will be able to modify settings of the mailbox and delete it.
Signature
You can design a signature that will be automatically placed at the end of each outgoing e-mail.
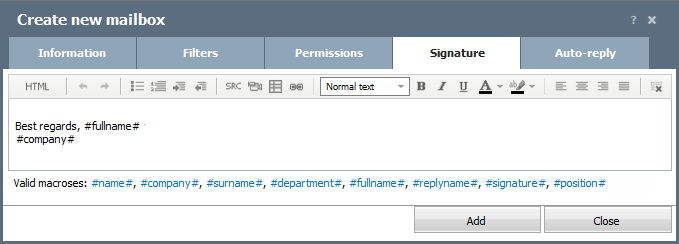
The message editor s used to design a signature. Its feature is that instead of specifying the information about yourself you can use macros that substitute the personal and contact details of the current user:
- #name# — employee's name.
- #user.name# — employee's name.
- #surname# — employee's surname.
- #user.surname# — employee's surname.
- #user.patronymic# — employee's middle name.
- #fullname# — full name of the employee.
- #company# — company name.
- #department# — department name.
- #user.location# — location of the employee.
- #user.email# — e-mail address.
- #user.phone_work# — work phone number.
- #user.phone_fax# — fax number.
- #user.phone_mobile# — mobile phone number.
- #user.messenger_icq# — ICQ.
- #user.messenger_msn# — MSN.
- #user.messenger_skype# — Skype.
- #user.messenger_yahoo# — Yahoo messenger.
Random Signatures
A mailbox has a feature of creating several variants of signature to the messages that will be used randomly.
To do it, one should separate each signature, created at the corresponding tab, from the next one via the horizontal line (the <hr> tag) that can be inserted by pressing the  button of the message editor.
Auto-Reply
In this tab the auto-reply for the mailbox can be set up. If the auto-reply is enabled, replies for all messages coming to this mailbox will be automatically generated and sent.
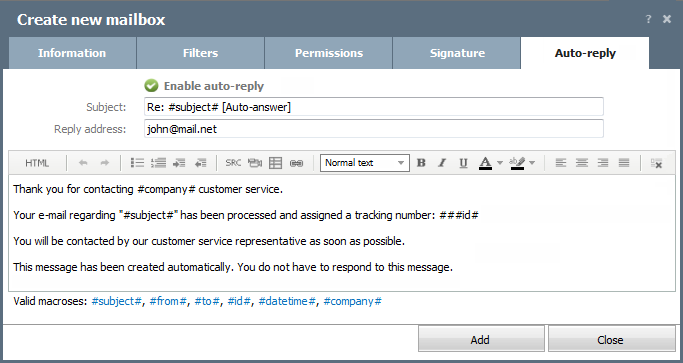
In order to enable the auto-reply you should press the  button, after which it will change to:
 ![]() . The automatically generated subject for each reply is specified at the "Subject" field. The address the person that received the message can send his/her reply at is specified at the "Reply address" field. The default value of this field is the address of the given mailbox. You can create the text of the auto-reply messages using the message editor in the lower part of the window.
. The automatically generated subject for each reply is specified at the "Subject" field. The address the person that received the message can send his/her reply at is specified at the "Reply address" field. The default value of this field is the address of the given mailbox. You can create the text of the auto-reply messages using the message editor in the lower part of the window.
You can use the macros in the subject and in the text of the auto-reply messages the same as in the signature to the mails. The macros can be used here:
- #subject# — it automatically substitutes the topic of the received message;
- ###id# — it automatically substitutes the ID, unique identifier of the message that is automatically assigned to each e-mail;
- #from# — it automatically substitutes the address of the mail sender;
- #to# — it automatically substitutes the address of the mail receiver;
- #datetime# — it automatically substitutes the current date and time;
- #company# — it automatically substitutes the name of your company.
To save the settings of the mailbox, one should press the "Add"/"Update" button, located at the bottom of any tab, listed above. If you want to discard the changes in settings, you should press the "Close" button.
← E-Mail
Delete Mailbox →
|